#
Create and Modify Workflows and Workers
#
Prepare Your Work Environment
After you have installed and started the FRINX Machine (see "https://github.com/FRINXio/FRINX-machine") you will want to modify existing workflows or add new workflows and workers to meet your needs. We will be referring to the machine that is running the FRINX Machine containers as host. Typically that host is a VM running on your laptop, in your private cloud or in a public/virtual private cloud. Here is how to get started.
#
Creating a worker
Now that we have our environment prepared, we can move on to the first step of creating a workflow. First we will create a worker that defines the tasks utilized in our workflow. The goal is to have the task in our workflow receive two input parameters (id_1 and id_2). The purpose of our task is to add the two input variables and return the result. The execution logic of our task will be implemented in a small python function called worker.
For a full documentation of tasks, workflows and the capabilities of Netflix Conductor, please go to https://netflix.github.io/conductor/
Create a worker in a correct repository (name of the worker is up to you):
~/FRINX-machine/fm-workflows/demo-workflows/workers$ touch add_integers_worker.pyThis is what we put in the file in our case:
from __future__ import print_function


def execute_add_two_integers(task):
  addend_one = task['inputData']['id_1']
  addend_two = task['inputData']['id_2']
  result = int(addend_one) + int(addend_two)
  return {'status': 'COMPLETED', 'output': {'result': result}, 'logs': []}

def start(cc):
  print('Starting add_two_integers worker')
  cc.register('add_two_integers', {
  "name": "add_two_integers",
      "retryCount": 0,
      "timeoutSeconds": 30,
      "inputKeys": [
          "id_1",
          "id_2"
      ],
      "timeoutPolicy": "TIME_OUT_WF",
      "retryLogic": "FIXED",
      "retryDelaySeconds": 0,
      "responseTimeoutSeconds": 30
      }
  )
  cc.start('add_two_integers', execute_add_two_integers, False)
Core of the worker is a task that contains simple method which does addition with two inputs which user provides in GUI as you will see later. Workers can have multiple tasks within itself, in our case one is enough as an example.
After this, you must register your worker in the main python file "main.py" in the same directory where you just created your worker. All workers you want to use in Frinx Machine must be included in this file. File might look similar to this:
  import time
  import worker_wrapper
  from frinx_rest import conductor_url_base
  import inventory_worker
  import lldp_worker
  import platform_worker
  import vll_worker
  import unified_worker
  import vll_service_worker
  import vpls_worker
  import vpls_service_worker
  import bi_service_worker
  import common_worker
  import psql_worker
  from import_workflows import import_workflows
  import cli_worker
  import netconf_worker
  import uniconfig_worker
  import http_worker
  from importDevices import import_devices
  import os
  import add_integers_worker


  workflows_folder_path = '../workflows'
  healtchchek_file_path = '../healthcheck'

  def main():
    if os.path.exists(healtchchek_file_path):
        os.remove(healtchchek_file_path)


    print('Starting FRINX workers')
    cc = worker_wrapper.ExceptionHandlingConductorWrapper(conductor_url_base, 1, 1)
    register_workers(cc)
    import_workflows(workflows_folder_path)
    import_devices("../devices/cli_device_data.csv", "../devices/cli_device_import.json")
    import_devices("../devices/netconf_device_data.csv", "../devices/netconf_device_import.json")

    with open(healtchchek_file_path, 'w'): pass

    # block
    while 1:
        time.sleep(1000)


  def register_workers(cc):
    platform_worker.start(cc)
    lldp_worker.start(cc)
    inventory_worker.start(cc)
    unified_worker.start(cc)
    psql_worker.start(cc)
    add_integers_worker.start(cc)
    # vll_worker.start(cc)
    # vll_service_worker.start(cc)
    # vpls_worker.start(cc)
    # vpls_service_worker.start(cc)
    # bi_service_worker.start(cc)


  if __name__ == '__main__':
    main()
Notice lines 22 and 53, you must import both the worker file and include it in "register_workers(cc)" method.
That is all in terms of worker creation. There is however few more things to do in your environment. After doing all the above, we will want to build our Frinx Machine based on our local changes. For that we must edit the file "swarm-fm-workflow.yml"
~/FRINX-machine/fm-workflows/composefiles$ ls

swarm-fm-workflows.yml
Find block "demo-workflows" in this file. Change the image to use a image called "local" (2):
demo-workflows:
 image: frinx/demo-workflows:local
 logging:
   driver: "json-file"
   options:
     max-file: "3"
     max-size: "10m"
 environment:
   - UNICONFIG_URL_BASE=https://${CONSTRAINT_HOSTNAME}_uniconfig:8181/rests
 healthcheck:
   test: cat /home/app/healthcheck
   interval: 10s
   timeout: 5s
   retries: 5
   start_period: 10s
 deploy:
   # placement:
   #   constraints:
   #     - node.hostname == ${CONSTRAINT_HOSTNAME}
   mode: replicated
   replicas: 1
Now we can build our fm-workflows image with the added task. Use:
~/FRINX-machine/fm-workflows$
docker build --no-cache -f demo-workflows/Dockerfile -t frinx/demo-workflows:local ./demo-workflows/
While it is not necessary to use "--no-cache" flag, we recommend it to make sure you rebuild the image with newly edited code and not the one stored in cache memory.
Now just start fm-workflows and you're good to go:
~/FRINX-machine/fm-workflows$
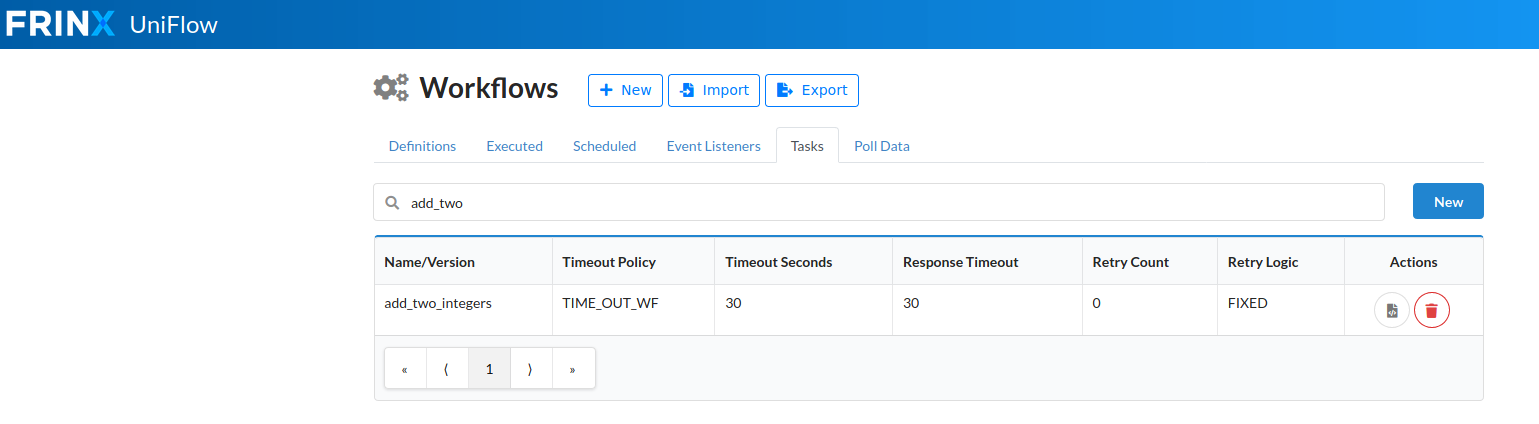
./startup.shIf you did everything correctly, you will now see your new task in Frinx Machine. Go to Workflow Manager -> Tasks -> Search:
Now you can create workflow that uses this task. Workflow Manager -> "+ New":
#
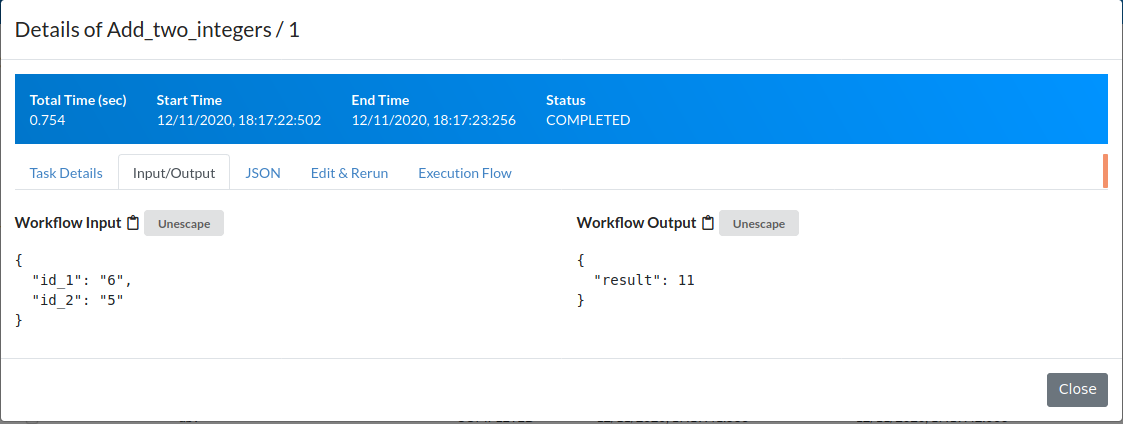
After being prompted for inputs, you should see that addition ran successfully:
{
  "taskType": "add_two_integers",
  "status": "COMPLETED",
  "inputData": {
      "id_1": "6",
      "id_2": "5"
  },
  "referenceTaskName": "add_two_integers_ref_XCFR",
  "retryCount": 0,
  "seq": 1,
  "pollCount": 1,
  "taskDefName": "add_two_integers",
  "scheduledTime": 1607707042557,
  "startTime": 1607707043195,
  "endTime": 1607707043237,
  "updateTime": 1607707043196,
  "startDelayInSeconds": 0,
  "retried": false,
  "executed": true,
  "callbackFromWorker": true,
  "responseTimeoutSeconds": 30,
  "workflowInstanceId": "1fcf782c-1cd6-4219-a6eb-e9d218de8b80",
  "workflowType": "Add_two_integers",
  "taskId": "9b88a65e-9869-420c-bd05-d42963948a39",
  "callbackAfterSeconds": 0,
  "workerId": "b5592d30c747",
  "outputData": {
      "result": 11
  },
  "workflowTask": {
      "name": "add_two_integers",
      "taskReferenceName": "add_two_integers_ref_XCFR",
      "inputParameters": {
        "id_1": "${workflow.input.id_1}",
        "id_2": "${workflow.input.id_2}"
      },
      "type": "SIMPLE",
      "decisionCases": {},
      "defaultCase": [],
      "forkTasks": [],
      "startDelay": 0,
      "joinOn": [],
      "optional": false,
      "taskDefinition": {
        "createTime": 1607703392256,
        "createdBy": "",
        "name": "add_two_integers",
        "retryCount": 0,
        "timeoutSeconds": 30,
        "inputKeys": [
            "id_1",
            "id_2"
        ],
        "outputKeys": [],
        "timeoutPolicy": "TIME_OUT_WF",
        "retryLogic": "FIXED",
        "retryDelaySeconds": 0,
        "responseTimeoutSeconds": 30,
        "inputTemplate": {},
        "rateLimitPerFrequency": 0,
        "rateLimitFrequencyInSeconds": 1
      },
      "defaultExclusiveJoinTask": [],
      "asyncComplete": false,
      "loopOver": []
  },
  "rateLimitPerFrequency": 0,
  "rateLimitFrequencyInSeconds": 1,
  "workflowPriority": 0,
  "iteration": 0,
  "taskDefinition": {
      "present": true
  },
  "loopOverTask": false,
  "taskStatus": "COMPLETED",
  "queueWaitTime": 638,
  "logs": []
}